These top tips will make it easier for you to stay healthy and avoid that heavy, bloated feeling after over-indulging.
· If you stick to your mostly raw diet with a few treats in-between you won’t feel like you are missing out.
· Remember the 80/20 rule: 80% alkaline, 20% acid (ie 80% salad or veggies with 20% protein: ham or turkey).
· Find some great raw Christmas recipes, make them and have ready for the day to ensure there are plenty of healthy options on the table next to stuffing, ham and roast potatoes!
· There are loads of salads and marinated vegetable recipes and you could also include a yummy raw chocolate chia pudding.
· Make some spiced mixed nuts to snack on, or some kale chips for nibbles.
· Having fermented vegetables to serve as a condiment will also work wonders for digestion – especially if you and your guests have over-indulged! Try our fermented carrots or pickles to add to your salads (see recipes below).
· Having some Kombucha or Coconut Kefir on hand to drink along with your mocktails will see you avoiding the bloat and weight gain and staying healthy (see recipe below).
· Have a green smoothie for brekky before the festivities and the following morning.
· Keep sipping on fresh filtered water at all times. This will help you stay hydrated and keep the food cravings at bay.
· Don’t beat yourself up mentally. Try not to lecture yourself over any slip-ups, or food mistakes made during the Christmas break.
Here are our favourite go to recipes to have on hand, not only at Christmas but all year round.
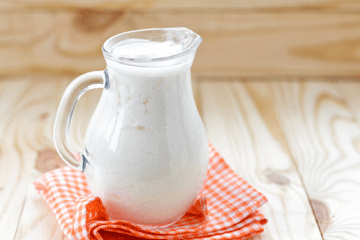
COCONUT MILK KEFIR IN A FLASH
A healthy diet is the foundation of a healthy gut, but taking probiotics and consuming probiotic foods and drinks is a simple and natural way to supercharge your gut health.
Unlike yogurt, kefir can actually colonize the intestinal tract and is simple and fun to make at home.
Coconut milk kefir is one of the easiest of fermented foods to make at home. You don’t need any fancy kitchen equipment or expensive health foods, just a few household items, which are probably sitting in your kitchen.
Kefir can be made with cows milk, I’m not a huge dairy milk drinker so making coconut milk kefir is ideal for me, and it taste so good I use it as a dessert more often then not.
Kefir can be made with kefir grains or with a Kefir powder (found in any health food store in the fridge section – for under $10 for a back of 5 sachets)
You will need:
1 ltr sterilised jar with secure lid
Wooden or silicone spoon
Ingredients:
· 2 x 400ml tin organic coconut milk
· 1 x sachet kefir starter powder
Preparation:
· Add the Kefir powder to the jar, then add the 2 x tins of coconut milk.
· With a wooden or silicone spoon, stir the powder and milk until well combined and powder dissolves.
· Place the lid on your jar and place in a warm spot in your kitchen, out of direct sunlight. (There is no need to put a tea towel around the jar).
· Leave for 24 hours, then with a wooden or silicone spoon stir vigorously.
· Place lid on securely and place in the refrigerator.
· I recommend stirring it daily. Leaving it in the fridge for too long untouched will cause a second fermentation process, and will cause it to go fizzy. This is perfectly fine, and in fact you can add fruit to the 2nd ferment if you desire.
LACTO – FERMENTED CARROT STICKS
If you are just starting to introduce fermented vegetables to your family, fermenting the humble carrots may be your best bet to start. Most children (big & small) enjoy carrots. So a positive association is already present, and who doesn’t love to snack on a carrot stick from time to time!
You will need:
1.5Ltr sterilised Jar with airlock lid
Knife & chopping board
Weight
Porous cloth/Tea towel
Twine or rubber band
Ingredients:
· 6 large carrots, cut into 1cm sticks
· 1 tsp black peppercorns
· 1 orange, zest peeled off in long strips
· 2 cinnamon sticks
· 2 tbsp sea salt; extra for sprinkling
· Washed cabbage leaf
Preparation:
· Soak the carrots in cold water with a good dash of apple cider vinegar for 20 minutes then scrub them thoroughly to prevent any mold from forming during the fermentation process.
· Cut the carrots into 1cm batons/fingers. Place the carrots, cinnamon, peppercorns and orange zest in to your fermentation jar and sprinkle a bit of sea salt as you go along.
· Prepare a brine of 2 tablespoons sea salt to 2 cups purified water, making sure to stir well to dissolve the salt, and fill the fermentation jar with the brine so it covers the carrots, ensure you leave a 2cm gap at the top for the cabbage leaf.
· To weigh the carrots down, fold a clean cabbage leaf over and place it on top of the carrots, then place your weight on top of the cabbage leaf. You want to ensure that the carrots remain fully submerged.
· Cover the jar with a porous cloth/tea towel and place a rubber band or twine around the mouth of the jar (to prevent any flies or bugs from getting in), place it in a warm spot in your kitchen and allow the carrots to ferment for 5 to 10 days undisturbed. It is up to you how long you ferment for, the longer you leave the jar, the higher the level of good bacteria present. Some people prefer the tangier flavours that come with extra fermenting time, while others prefer a milder flavour.
You will know fermentation has begun when you see bubbles rising to the top of the jar and the water becomes cloudy. A thin layer of white scum might also form on the surface of the water. This is harmless and can be scooped away with a clean non-metal spoon if you wish.
Taste the carrots during this timeframe to see if the flavour is to your liking. This is the only sure sign that your carrots are done.
Once you’ve decided they’re done, take the tea towel off, place the lid on, tighten the lid and store the pickles in the refrigerator.
Once opened, it should last up to 2 months in the fridge when kept submerged in liquid.
Starting your next batch of fermented carrots:
It’s easy to start your next batch. Simply reserve a couple of centimeters of liquid from your jar to kick start the good bacteria in your next batch; follow the above recipe again for your next batch ensuring you add the reserved liquid…. This is called culturing.
Cultured carrots can be made from the same process, except replace brine with starter culture powder (or whey). Mix culture into water to dissolve first, before pouring over carrots
Variations:
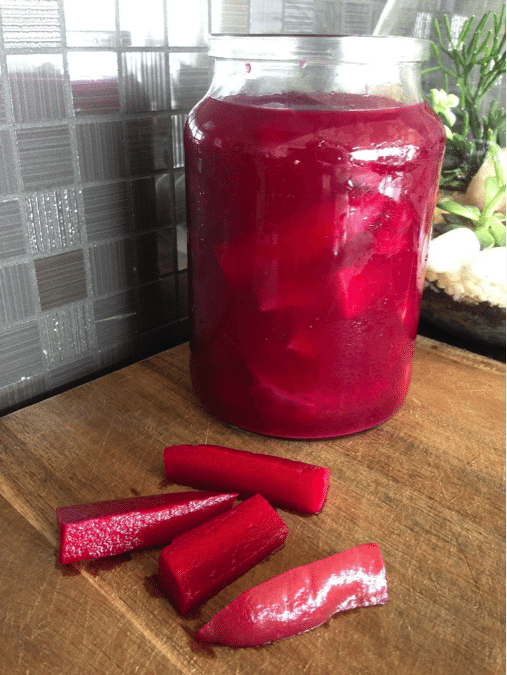
Once your kids get use to fermented carrot sticks, try adding beetroot sticks with them on your next ferment.
It turns the carrots hot pink and create a vibrant pink juice that the kids will love.
Done be afraid to experiment with flavours.
You can change your spice mix up each time – you can add garlic, ginger, chilli. The flavours are endless and are only limited by your imagination
Tips:
Don’t forget to drink the liquid too, it’s like a beet kvass, and full of all the good bacteria you need.
If your children don’t like the taste of the liquid or fermented Veggies you can easily add it to their meals discretely… pour the juice over your cook spag bol mince and fold it through, or finely chop the carrots before serving your spag bol and fold them through. The “fermentation” taste will be lost in the meat.
I don’t recommend heating fermented foods, as you don’t want to break down the bacteria, so it’s best to add at the end of your cooking.
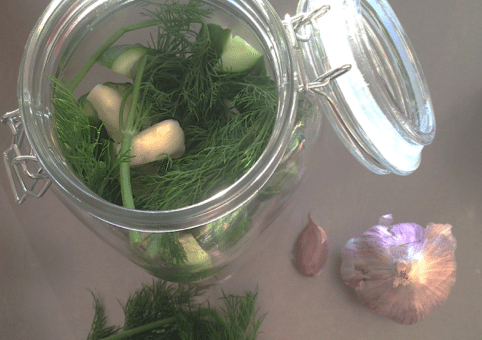
DILL PICKLES
If it’s so easy to transform a cucumber into a pickle, though, then why are grocery store shelves filled with so many mediocre specimens? In a word…Vinegar. Many store-bought brands use vinegar to pickle cucumbers because it guarantees a sour flavour and acts as a preservative. However, this method misses the entire point of pickled food. Using vinegar instead of brine (salt + water) prevents natural fermentation from occurring. Without natural fermentation the live bacteria cultures that turn pickles into a healthy probiotic food are absent. Not to mention that when pickles are soaking in vinegar for a long time it typically results in an overly sour flavor and rather limp texture.
There are brands of naturally fermented pickles to be found in stores, although they can be expensive. Making naturally fermented pickles at home is cost effective and easy to do and the anticipation of biting into that first spear is more fun than you might think. When you taste your first homemade pickle, be prepared for an audible crunch and a pleasantly tangy flavor. It will be ever so slightly infused with garlic and dill and taste fresher and snappier than a store-bought spear.
You will need:
1.5Ltr sterilised Jar with air lock lid
Knife & chopping board
Weight
Porous cloth/Tea towel
Twine or rubber band
Ingredients:
· 8 pickling cucumbers, non waxed (or if you cant find mini cucumbers you can purchase 2-3 large green cucumbers)
· 3 sprigs of fresh dill;
· 3 cloves garlic, whole and peeled;
· 1 tbsp pickling spices of your choice – can be a mix (peppercorns, mustard seeds, bay leaves, cloves, fennel seeds, coriander seeds);
· 2 tbsp sea salt; extra for sprinkling
· Washed cabbage leaf
Preparation:
· Soak the cucumbers in cold water with a good dash of apple cider vinegar for 20 minutes then scrub them thoroughly to prevent any mold from forming during the fermentation process.
· If using large cucumber you can cut them in half and then cut them in quarters – so you have made fingers. Place the cucumbers, dill, garlic and spices in your fermentation jar and sprinkle a bit of sea salt as you go along.
· Prepare a brine of 2 tablespoons sea salt to 2 cups purified water, making sure to stir well to dissolve the salt, and fill the fermentation jar with the brine so it covers the cucumbers, ensure you leave a 2cm gap at the top for the cabbage leaf.
· To weigh the cucumbers down, fold a clean cabbage leaf over and place it on top of the cucumbers, then place your weight on top of the cabbage leaf. You want to ensure that the cucumber remains fully submerged.
· Cover the jar with a porous cloth/tea towel and place a rubber band or twine around the mouth of the jar (to prevent any flies or bugs from getting in), place it in a warm spot in your kitchen and allow the cucumbers to ferment for 5 to 10 days undisturbed.
You will know fermentation has begun when you see bubbles rising to the top of the jar and the water becomes cloudy. A thin layer of white scum might also form on the surface of the water. This is harmless and can be scooped away with a clean non-metal spoon if you wish. However, trust your nose. If the pickles smell bad while fermenting, throw them out.
Taste the pickles during this timeframe to see if the texture and flavour are to your liking. This is the only sure sign that your pickles are done.
Once you’ve decided they’re done, take the tea towel off, place the lid on, tighten the lid and store the pickles in the refrigerator.
Because there is no vinegar to preserve the pickles, they will only keep for roughly a few weeks if submerged in liquid.
If the flavour of the pickles is not vinegary enough for you, try drizzling a little apple cider vinegar on the spears right before eating.
Starting your next batch of pickles:
It’s easy to start your next batch. Simply reserve a couple of centimeters of liquid from your jar to kick start the good bacteria in your next batch; follow the above recipe again for your next batch ensuring you add the reserved liquid…. This is called culturing.